How to Give B12 Injections at Home to Yourself · PA Relief
Introduction
If you’ve ever been told you need vitamin B12 injections, you may have felt two competing pressures: “I need to start right away” and “I can’t mess this up.” In my hands-on work coordinating home injection routines for people managing B12 deficiency, the biggest avoidable setbacks weren’t about knowledge—they were about confidence, preparation, and technique. This guide shows you how to apply b12 injections at home safely and consistently, with practical steps, common pitfalls to watch for, and how to make your first self-injection less stressful.
Before You Start: What “Home B12 Injections” Really Requires
Giving yourself a B12 injection at home isn’t complicated, but it does require the right setup and clear medical direction. In my experience, the safest home process starts with confirming four things:
- Your prescription details: dose (e.g., 1,000 mcg), frequency, and whether it’s hydroxocobalamin or cyanocobalamin.
- Your injection plan: where you’re supposed to inject (commonly deltoid, ventrogluteal, or thigh/outer area).
- Your supplies: syringes/needles sized for your injection site, alcohol swabs, gauze/cotton, and a sharps container.
- Your monitoring approach: what symptoms to expect and when to contact your clinician.
Also, if you have significant bleeding disorders, are on anticoagulants, have an active infection at the injection site, or you’ve had problems with fainting during injections, ask your clinician before trying self-injection. Technique and safety are inseparable here.
Choosing the Injection Site: Comfort, Consistency, and Accuracy
Injection site choice matters because it impacts ease of self-administration and how reliably the dose reaches the intended tissue layer. I’ve seen people abandon home injections early simply because they picked a site that was awkward for their body or required a second person.
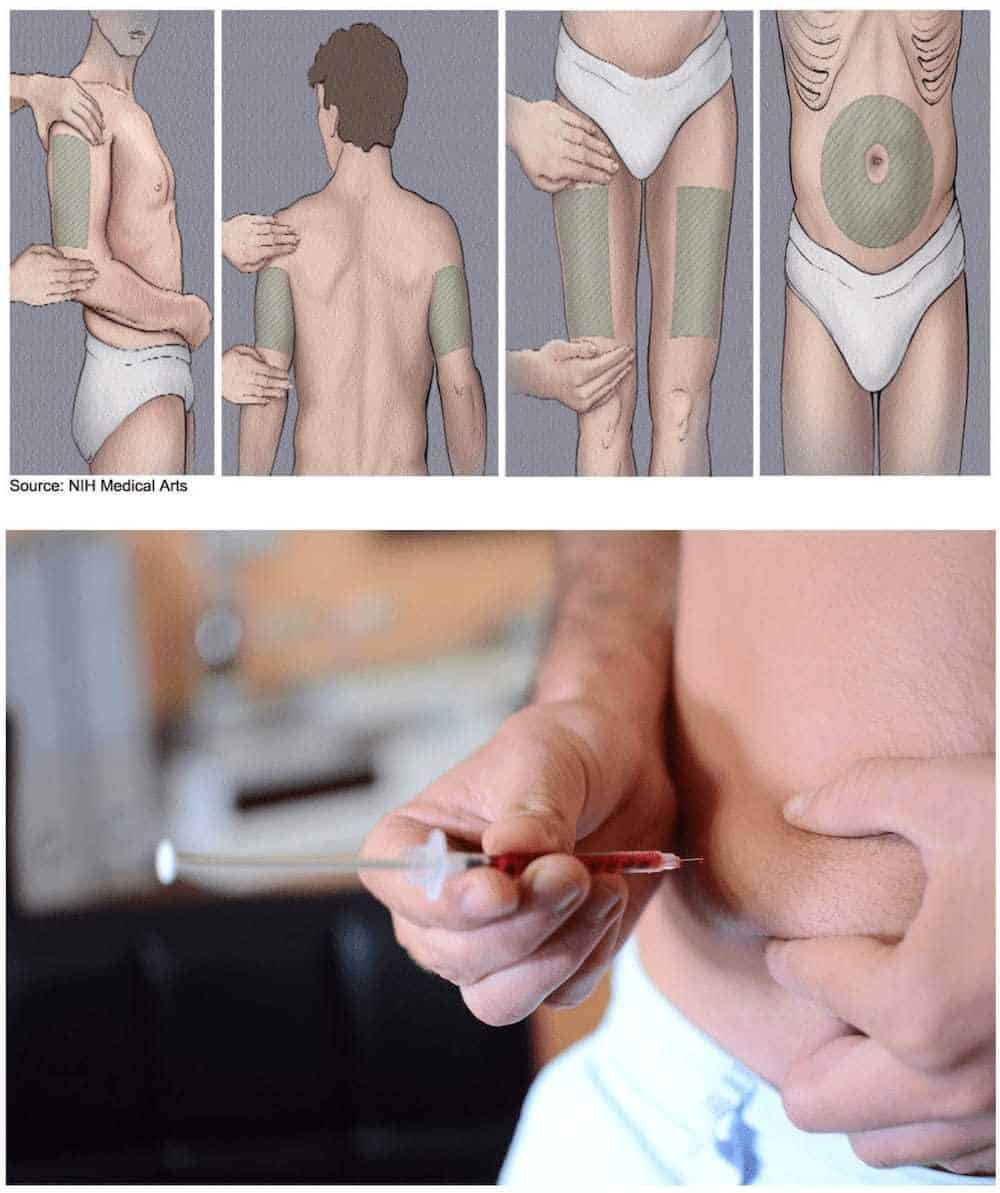
Common B12 injection locations
- Deltoid (upper arm): often used when dosing and clinician guidance support it; smaller area can feel “tight” for first-timers.
- Ventrogluteal (hip region): frequently favored for tissue depth and stability; can be excellent once you learn the landmark approach.
- Thigh (outer/upper area): accessible and practical for self-injection.
How I teach landmarking (the part that prevents fear)
My practical lesson: don’t “guess” where the needle should go—use consistent landmarks every time. For ventrogluteal injections, I advise practicing the landmarking motion without a needle first (with clean hands and no syringe). For deltoid, I encourage selecting an area with enough muscle bulk and keeping the arm relaxed.
Tip: If you can’t comfortably reach the site, don’t force it. Switch to a site you can access reliably—consistency beats occasional improvisation.
Step-by-Step: How to Apply B12 Injections at Home (Self-Injection Workflow)
This section focuses on the typical workflow people follow for home how to apply b12 injections. Follow your clinician’s instructions first; if they differ, follow the prescription plan you were given.
What you’ll need
- B12 vial and prepared syringe/needle (as prescribed)
- Alcohol swabs
- Gauze/cotton
- Sharps container (not a regular trash can)
- Gloves if your clinician recommends them
- A timer and a clean, flat workspace
1) Set up a clean, calm workspace
I always tell people to clear a stable surface and gather everything before opening anything. Rushing mid-step is where technique slips—especially with needle handling. Wash your hands, keep the vial and syringe in order, and open supplies so you don’t hunt during the procedure.
2) Inspect your medication
Check the vial label and confirm it matches your prescription. Ensure the solution looks normal for the product type. If anything seems off (wrong medication, broken seal, unexpected appearance), stop and contact your pharmacy or clinician.
3) Choose the injection site and position your body
Use your planned site and adopt a stable posture. In my experience, the most effective positioning is the one that keeps the muscle relaxed. If you tense the area, injections tend to be more painful and more difficult.
4) Clean the skin thoroughly
Wipe the injection site with an alcohol swab using a consistent motion. Let it air dry. If you touch the cleaned area afterward, re-clean.
5) Administer the injection using your prescribed technique
Follow the injection method you were trained on (needle angle and depth are sometimes described differently depending on injection site and needle guidance). Keep your movement controlled and deliberate.
Pressure and speed: In my hands-on teaching, I emphasize steady, not frantic. Once the needle is properly positioned, injecting at a consistent pace typically improves comfort.
6) Withdraw the needle and apply gentle pressure
Remove the needle smoothly. Immediately apply gentle pressure with gauze/cotton if you have tenderness or slight bleeding. Don’t rub aggressively.
7) Dispose of sharps immediately
Place the used needle/syringe directly into a sharps container. This one habit prevents the most serious “home injection” safety problem.
Aftercare: What’s Normal vs. What Needs Attention
After how to apply b12 injections, the body may react. Some discomfort can be expected, especially in the first few weeks while you find your rhythm and the body adapts.
Common, usually manageable reactions
- Soreness or mild tenderness at the injection site
- Light redness
- Small swelling
- Brief bruising
When to contact a clinician
- Increasing pain, warmth, or spreading redness
- Signs of infection (fever, pus, worsening swelling)
- Persistent bleeding or severe bruising
- Allergic-type symptoms (hives, facial swelling, trouble breathing)
In my experience, early contact is always better than waiting. If something feels “not right,” it usually isn’t the moment to push through.
Common Mistakes I See (and How to Fix Them)
When people struggle with self-injection, it’s typically one of these issues:
- Trying to inject before the skin is fully dry (can increase irritation).
- Changing technique every session (breaks consistency and confidence).
- Skipping injection-site rotation (can concentrate soreness in the same spot).
- Not preparing a sharps disposal workflow (delays safe disposal).
- Tensing the muscle (often increases pain).
Fix I recommend: Use a simple checklist each time—hands washed, supplies ready, site cleaned and dry, correct site selected, injection performed steadily, sharps disposed immediately.
Practical Rotation Plan and Scheduling Tips
Many clinicians advise rotating injection sites to reduce localized irritation. A rotation plan can also help your brain feel “in control,” which matters because anxiety can worsen pain perception.
- Track your last injection site: even a quick note on your phone helps.
- Rotate between approved sites: stick to your clinician’s permitted locations.
- Set a consistent day/time: if you do it at the same time each week, you’re less likely to feel rushed.
- Don’t change dose or product timing without guidance: spacing and dosing matter clinically.
FAQ
Is it safe to give myself B12 injections at home?
For many people with an established prescription and training, home administration is safe. The key is following your clinician’s instructions on dose, injection site, needle angle/depth, and disposal practices. If you have bleeding risk, active infection at the site, or severe injection-related anxiety/fainting history, ask your clinician before proceeding.
What should I do if I feel pain or resistance during the injection?
Stop and reassess your technique if something feels clearly wrong. Don’t force the needle. Pain can come from tension, incorrect landmarking, or injection into irritated tissue. If you repeatedly experience significant resistance or persistent worsening pain, contact your clinician for a technique review.
How often should I rotate B12 injection sites?
Rotation is usually recommended between approved locations to reduce soreness. Your clinician may specify a rotation schedule based on your injection site, dose, and tolerance. Keep consistent landmarking and rotate as directed rather than switching randomly.
Conclusion
Learning how to apply b12 injections at home becomes much easier when you treat it like a repeatable process: confirm your prescription details, pick an injection site you can access comfortably, use consistent skin cleaning and positioning, inject with steady control, and dispose of sharps immediately. In my hands-on experience, the biggest improvement usually comes after you build a simple checklist and practice the landmarking step before you ever feel rushed.
Next step: Print or save a one-page injection checklist (supplies, site, steps, sharps disposal) and schedule your first injection when you can take your full time—no interruptions, no rushing.
Discussion