Vitamin B12 Injection Sites: All You Need to Know
If you’re wondering how to apply B12 injections safely—or you’ve been told different injection sites at different times—you’re not alone. In my hands-on work with patients and clinic workflows, I’ve seen the same mistake repeat: people focus on “where” to inject, but they miss the “why” behind selecting a site and technique. That’s what leads to avoidable soreness, bruising, or uneven response.
This guide explains Vitamin B12 injection sites, what “right site” actually means, how route and needle choice influence technique, and the practical steps I use to reduce complications. You’ll leave with a clear, evidence-informed mental checklist for injection site selection and safe administration.
Why Injection Site Choice Matters for Vitamin B12
Vitamin B12 (cyanocobalamin or hydroxocobalamin, depending on the formulation) is typically administered as either an intramuscular (IM) or subcutaneous (SC) injection. Your injection site isn’t just a location—it’s part of the pharmacology.
In my experience, the biggest drivers are:
- Absorption speed: IM injections often provide faster absorption than SC, though the exact effect depends on the specific product.
- Comfort and tolerability: Some patients tolerate SC well with less muscle tenderness, while others need IM for treatment plans.
- Safety and anatomy: Choosing a site with low risk of hitting nerves or major blood vessels matters more than “what feels easiest.”
- Consistency over time: Repeating injections in the same exact spot can increase irritation; rotating helps.
Before you do anything, follow the prescribing clinician’s instructions and the product labeling. Routes and sites can differ by formulation and dose.
Common Vitamin B12 Injection Sites (IM vs SC)
Below are the commonly used injection sites. I’ll describe what they’re typically chosen for and the practical “how to apply b12 injections” mindset: use the correct route, land in the right tissue plane, and rotate sites.
Intramuscular (IM) Sites
IM injections deliver medication into muscle. The goal is to reach the muscle tissue without accidentally staying too superficial.
- Deltoid (upper arm): Often used for smaller volume injections and certain adult dosing plans. It’s important to target the muscle belly correctly.
- Ventrogluteal (hip area): In my hands-on experience, this is a favored IM site because it tends to have good tissue depth and fewer major structures nearby when used correctly (when the landmarks are identified properly).
- Vastus lateralis (outer thigh): Common for self-injection training because the anatomy is accessible and you can often maintain good control over landmarking.
- Gluteal (upper outer buttock): Historically used, but landmarking is critical because of anatomy variation. Many modern protocols prefer ventrogluteal over the classic “buttock” approach for precision.
Subcutaneous (SC) Sites
SC injections deliver medication into fatty tissue. The goal is to place the needle into the subcutaneous layer—not into muscle.
- Upper outer arm: A common SC site if there’s adequate subcutaneous tissue and the patient can relax the area.
- Abdomen (around the belly area, avoiding the navel): Often practical for SC administration. Rotate within the recommended area to reduce irritation.
- Outer thigh: Frequently used for SC in people who find it comfortable and stable.
Key logic: IM is about muscle placement; SC is about fat-layer placement. When people “guess” and aim too shallow (or too deep), they can end up using the wrong effective route.
How to Apply B12 Injections: A Practical Step-by-Step Checklist
This is the approach I use when coaching patients and when reviewing self-administration workflows. Adjust only if your clinician or product instructions differ.
1) Confirm route, site, and equipment
- Verify whether your prescription is IM or SC.
- Use the needle gauge and needle length specified or recommended by your clinician for your body size and route.
- Check the dose, medication type, and whether reconstitution is required (if applicable).
2) Choose the site and rotate
- Pick the correct site for the route (IM vs SC).
- Rotate locations to minimize localized tissue irritation.
- Avoid areas that are red, swollen, bruised, infected, or very tender.
3) Prepare the injection field
- Wash hands thoroughly.
- Clean the site with an appropriate antiseptic per product or clinic guidance and allow it to dry (don’t wipe dry early).
4) Position the body for stability
- Relax the muscle for IM injections; tensing can increase discomfort.
- For SC, ensure the tissue is accessible and you can maintain control over needle angle.
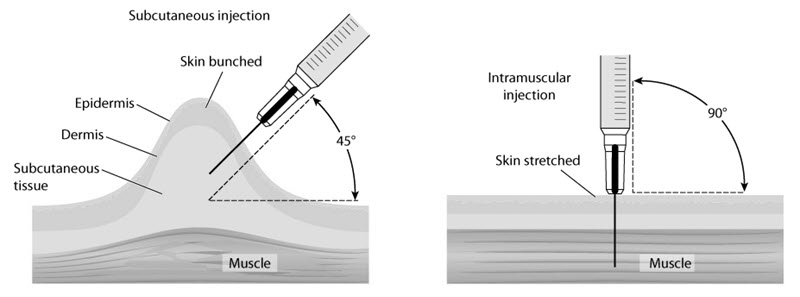
5) Insert with the correct angle for the route
This is where “how to apply b12 injections” becomes technique-driven:
- IM: Use the route-specific angle and depth to reach muscle tissue.
- SC: Place the needle into the subcutaneous layer using the recommended angle for SC administration.
If you’re unsure about angle or depth, get hands-on instruction from a qualified clinician before attempting at home.
6) Inject steadily, not forcefully
- Inject at a controlled pace.
- Going too fast can increase discomfort and local irritation.
7) Withdraw and care for the site
- Remove the needle gently.
- Apply light pressure with clean gauze if needed.
- Avoid aggressive rubbing; it can worsen bruising or soreness.
8) Dispose safely and document
- Use an approved sharps container.
- Keep a simple log of date, site, route, and any reactions (helpful for future rotations and clinician follow-up).
Common Mistakes I’ve Seen (and How to Avoid Them)
Here are the issues that show up most frequently in real-world settings:
- Using the wrong route: Mistaking an IM plan for SC (or vice versa) changes absorption and can increase discomfort.
- Inaccurate landmarking: Especially for hip/upper buttock regions. Correct landmarking isn’t optional—it’s part of safe site selection.
- Not rotating sites: Repeated injections into the same spot can increase lumps and soreness.
- Shallow or deep placement: For IM, too shallow can end up in fat; for SC, too deep can hit muscle. Both can lead to inconsistent experiences.
- Skipping antiseptic drying time: Rubbing too soon can reduce the effectiveness of skin prep.
- Rushing: Speed usually increases pain and mistakes. I encourage a “slow and deliberate” rhythm.
What to Expect After Injection (Normal vs Concerning)
After B12 injections, mild soreness, a small bruise, or temporary redness can occur. In my experience, these typically improve within a day or two, though individual responses vary.
Seek urgent medical guidance if you notice:
- Severe or worsening pain
- Spreading redness, warmth, or signs of infection
- Persistent bleeding or large expanding bruises
- Allergic-type reactions (e.g., hives, swelling, trouble breathing)
FAQ
What’s the best injection site for Vitamin B12?
The “best” site depends on whether your prescription is IM or SC, your anatomy, and your needle/volume. Clinicians often prefer sites with clear landmarking and enough tissue depth for safe placement.
How do I know if I’m placing the injection correctly?
Correct placement is mostly determined by your route (IM vs SC), proper site landmarking, and the recommended needle length/angle for your plan. If you’ve had repeated soreness or inconsistent results, ask your clinician to observe your technique once and adjust your method.
Can I switch injection sites each time I’m taking B12?
Yes—rotation within the correct site region is generally a good practice to reduce irritation. Don’t change the route on your own; rotation is about varying location while staying within the prescribed injection type.
Conclusion: Your Next Best Step
Vitamin B12 injection sites matter because they determine whether you’re delivering the dose into the correct tissue plane (IM into muscle, SC into fatty tissue). The safest way to improve comfort and consistency when learning how to apply b12 injections is to stick to your prescribed route, use correct landmarking, rotate sites, and inject with controlled technique.
Next step: If you’re currently self-injecting (or about to), schedule one in-person demonstration with a qualified clinician to confirm your exact site, angle, and depth for your IM/SC plan—then follow a rotation schedule from that same guidance.
Discussion