How To Give A B12 Injection In The Hip How to Give B12 Injections at Home to Yourself · PA Relief
Introduction
If you’ve been prescribed vitamin B12 injections, the hardest part is often not the medication—it’s the moment you have to decide where and how to inject it safely. I’ve helped manage home injection routines with patients who were anxious about “doing it wrong,” and the difference between a painful, stressful session and a smooth one usually comes down to proper technique, correct site selection, and a clear safety checklist. In this guide, I’ll walk you through how to give a B12 injection at home to yourself, including exactly what to consider when learning how to give a b12 injection in the hip.
Before You Inject: What You Need to Confirm
When I coach people for at-home B12 injections, I start with verification, because the safest technique is useless if the basics aren’t aligned.
Check your prescription details
- Medication type: Ensure it’s your prescribed B12 formulation (dose and concentration matter).
- Route: Many B12 therapies are given intramuscular (IM), but not all are—follow your clinician’s instructions.
- Frequency: Don’t improvise dosing schedules.
- Needle/syringe size: Your clinician may specify needle gauge/length based on body habitus.
Plan your supplies (set up before you open anything)
- Medication vial (or prefilled syringe if provided)
- Needle and syringe (only if your plan requires assembly)
- Alcohol swabs or appropriate antiseptic
- Clean gauze/cotton
- Sharps disposal container
- Gloves if recommended by your clinician
Choose a safe injection environment
Pick a well-lit, clean area where you can keep your hands steady. In my hands-on experience, the “spontaneous” injections people attempt in bathrooms with poor lighting are the ones that lead to missed landmarks, wasted supplies, and avoidable fear.
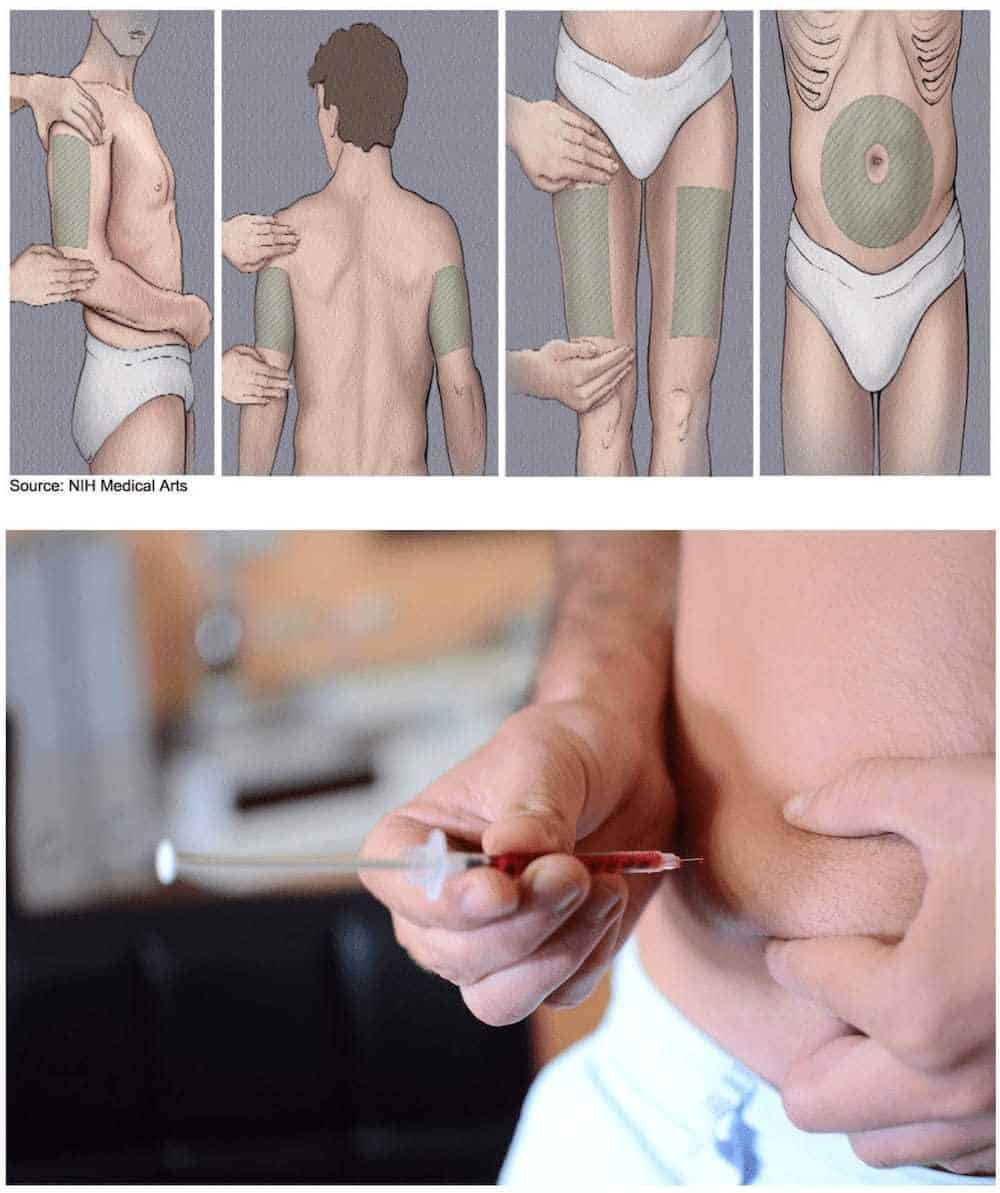
Common B12 Injection Sites (and When the Hip Makes Sense)
IM B12 injections are commonly given in areas with enough muscle mass and minimal risk of hitting major structures. The most frequently discussed sites include the deltoid (upper arm), ventrogluteal/gluteal regions (buttocks/hip area), and sometimes the thigh/other approved muscular sites—depending on your prescription and clinician preference.
Hip/upper outer buttock region: why it’s used
When people ask how to give a b12 injection in the hip, they’re usually referring to an outer hip/gluteal muscle region targeted for IM delivery. This area is often selected because it has strong muscle mass for deposition and can be easier to locate once you learn the landmarks.
Important limitation
I’ll be direct: you should use the hip/gluteal approach only if your prescribing clinician has taught you and deemed it appropriate for your body and medication. If you’re unsure about landmarks, a nurse visit for a supervised first injection is worth it.
How to Give a B12 Injection at Home to Yourself (Step-by-Step)
Follow your clinician’s instructions, but this is the general workflow I teach for IM self-injection. If any step differs from your medical guidance, your medical guidance takes priority.
Step 1: Wash hands and prepare your workspace
Clean hands reduce contamination risk. I also keep the vial and swabs at arm’s length so I’m not searching for supplies mid-procedure.
Step 2: Inspect the medication
- Confirm the correct medication, concentration, and expiration date.
- Check the liquid appearance per your formulation guidance.
Step 3: Position yourself for steady technique
For how to give a b12 injection in the hip, you want the muscle relaxed. Many people do this more comfortably lying down or reclining, then injecting with a stable, supported posture.
Step 4: Select and mark the injection landmark
Using your clinician’s landmark method, identify the outer region of the hip/gluteal area. In my experience, people do best when they visualize a consistent “target zone” before disinfecting—rushing the landmark step increases mistakes.
Step 5: Clean the skin
Use an alcohol swab and allow the area to air dry. Don’t blow on it or wipe again after disinfecting.
Step 6: Prepare the needle technique (IM)
For IM injections, your clinician typically specifies:
- Needle angle (commonly around 90 degrees for IM, but follow instruction)
- Depth guidance based on needle length and your body
- Whether to aspirate (some protocols advise against it; follow your clinician’s method)
Step 7: Inject the medication slowly and steadily
Slow injection can reduce discomfort. If you feel unusual resistance or severe pain, stop and reassess rather than forcing the process.
Step 8: Remove the needle safely
Use a clean gauze pad to gently apply pressure if needed. Avoid aggressive rubbing.
Step 9: Dispose of the needle immediately
Place the used needle and syringe directly into a sharps container. Never recap unless your prescribed supplies include a safe recapping method.
Aftercare: What’s Normal vs. What Needs Attention
After injections, mild soreness or a small bruise can occur—especially when first learning technique.
Common, generally manageable reactions
- Soreness at the injection site for a day or two
- Light redness
- Small bruising
Seek prompt medical advice if you notice
- Increasing redness, warmth, or swelling spreading over time
- Fever or flu-like symptoms
- Severe pain that doesn’t improve
- Signs of an allergic reaction (such as hives, facial swelling, trouble breathing)
Tips That Make Hip Self-Injection Easier (From Real Coaching Sessions)
These are the practical lessons I’ve seen reduce anxiety and improve consistency when people practice how to give a b12 injection in the hip.
1) Rotate sites as your clinician recommends
If you inject the same exact spot repeatedly, you’re more likely to see bruising or soreness. Rotation helps tissue recover.
2) Don’t “overthink” the first attempt—get landmark training first
One of the biggest problems isn’t technique—it’s uncertainty about landmarks. When I’ve watched someone learn the site accurately during supervised instruction, self-injection becomes dramatically less stressful.
3) Use a consistent routine every time
Same order: wash hands → prepare → identify landmark → disinfect → inject → dispose. Consistency prevents skipped steps.
4) Relax the muscle
Hip/gluteal IM injections are often easier when the target muscle is relaxed. If you’re tense, pause, reposition, and breathe.
FAQ
Can I inject B12 into the hip by myself safely?
Many people can learn to do it safely, but only after their clinician confirms the correct site/landmarks for you and demonstrates the technique. If you’re unsure about the injection location, ask for a supervised first injection.
What should I do if I accidentally inject the wrong spot or feel sharp pain?
If you experience sudden severe pain, significant bleeding, or symptoms that concern you, stop and seek medical guidance. For routine minor soreness, monitoring is often appropriate—but escalating or worsening symptoms should be assessed.
How can I reduce soreness after a B12 injection in the hip?
Use correct landmarks, relax the muscle, inject at a steady pace, and avoid aggressive rubbing after removal. Rotating sites also helps. If soreness becomes persistent or worsens, contact your clinician.
Conclusion
Learning how to give a b12 injection in the hip comes down to three things: confirming your prescription details and route, using accurate landmarks for IM delivery, and following a disciplined step-by-step routine with proper aftercare and sharps disposal. In my experience, once people get landmark training and a consistent workflow, self-injection becomes far less intimidating.
Next step: If you haven’t had a clinician demonstrate the hip injection landmark and technique for your specific setup (dose, needle type, and IM method), schedule that supervised first session before injecting on your own.
Discussion