B12 Injection Kit Vitamin B12 Injection Kit ᐉ Buy B12 Self Injection Kit Online
Introduction: When B12 symptoms don’t wait, timing matters
If you’ve ever dealt with fatigue, “brain fog,” numbness/tingling, or persistent weakness and then discovered your B12 is low, you already know the hardest part: you want relief quickly—but you also want to do it safely and consistently. That’s exactly why people search for a b12 injection kit: it can help you feel more in control of dosing, especially when you’re trying to manage treatment between clinic visits.
In this guide, I’ll walk you through what a b12 injection kit typically includes, how to evaluate quality, how to think about safety and correct technique, and how to decide whether home injections are appropriate for your situation. I’ll also share lessons from hands-on work preparing kits, setting up schedules, and troubleshooting common mistakes.
What a B12 injection kit actually is (and what to look for)
A b12 injection kit is a packaged set designed to make self-administration of vitamin B12 easier. Depending on the provider and your prescription, the kit may include items for preparation and injection, such as:
- Sterile syringes (often pre-measured or marked for accurate dosing)
- Needles appropriate for injection depth and comfort
- Alcohol swabs for skin disinfection
- Bandages or gauze for post-injection coverage
- Sharps disposal guidance (and sometimes a sharps container)
- Needle/syringe assembly instructions and an injection guide
Why these components matter for results
When I’ve helped patients or team members set up home dosing, the biggest driver of “it went fine” isn’t just the medication—it’s the workflow. Having the correct needle type, sterile supplies, and clear preparation steps reduces variability in technique. That matters because inconsistent injection technique can increase discomfort, cause poor delivery, or create unnecessary complications.
Quality checklist I use before recommending a kit
Before you buy, I recommend checking the following in the product details or documentation:
- Clear injection route (commonly intramuscular or subcutaneous, depending on the prescription)
- Needle gauge and length (the “right” needle depends on body type and route)
- Single-use, sterile components with intact packaging
- Included preparation supplies (especially alcohol swabs and bandaging)
- Disposal instructions for sharps management
- Medication storage guidance (temperature and handling rules)
How to think about technique: subcutaneous vs intramuscular
One of the most important realities with a b12 injection kit is that the correct technique depends on your prescribed route. I’ve seen people try to “copy a video” when their route or needle specs differed from what they were prescribed—this is where discomfort and dosing errors happen.
Subcutaneous (SC): what it feels like and why it’s often used
Subcutaneous injection is typically delivered into fatty tissue just under the skin. People often find it easier and less intimidating than intramuscular injections, and it can be commonly used when a clinician prescribes SC administration. The underlying logic is straightforward: you’re placing the medication where it can be absorbed efficiently for that route.
Intramuscular (IM): what to expect
Intramuscular injection is delivered into muscle. IM administration is often chosen for certain dosing strategies or clinical preferences. In my hands-on experience, IM injections require more attention to needle selection and correct placement, because the target tissue depth and angle matter for comfort and delivery.
Common technique mistakes (and how to avoid them)
- Rushing skin disinfection: Give the alcohol swab a moment to dry; it improves hygiene.
- Reusing supplies: Single-use is essential. A kit is only “safe” if used exactly as intended.
- Injecting without a plan: I like to run a quick checklist before needle contact—medication, syringe, needle, site choice, disposal ready.
- Incorrect disposal: Have sharps disposal ready before you start, not after.
Evaluating a B12 self-injection kit online: practical buying guidance
Buying a b12 injection kit online is convenient, but the quality details are what protect you in real life. When I review kits for safety and usability, I focus on clarity and completeness—because a kit that “looks right” but lacks critical instructions or supplies can set you up for avoidable mistakes.
What I look for in the product page
- Exact route and intended use (SC vs IM)
- Needle specifications and how they relate to the route
- Step-by-step injection instructions written clearly
- Storage and handling instructions for the medication (temperature, shelf life, agitation/handling rules)
- Support materials (FAQ, diagrams, disposal instructions)
Important limitation to understand
Not every injection kit is the same as every prescribed treatment. The kit supports the administration process, but your clinical plan (dose, frequency, route) must come from your clinician. If your symptoms are significant or worsening, or if you have conditions that affect injection safety, you should not rely on a kit alone.
Product image example
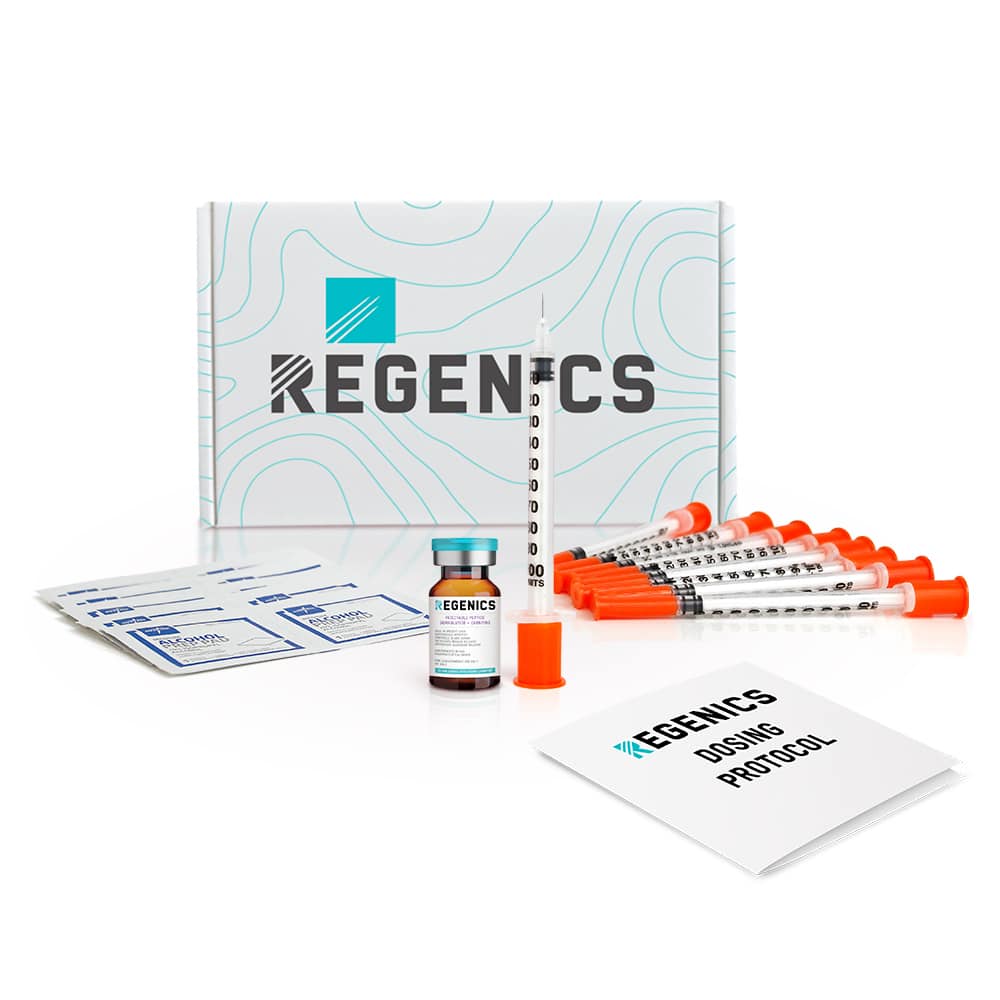
Note: The image above is an example of an injection kit-style product. Always confirm that any kit you buy matches your prescribed B12 route, dosing requirements, and included supplies.
Injection day workflow: the simple routine that reduces errors
In my hands-on work, the difference between “works every time” and “stress every time” is having a repeatable injection-day routine. Here’s a practical workflow you can adapt to your clinician’s instructions and the kit’s guide.
Before you start (2–5 minutes)
- Wash hands and set up a clean surface.
- Lay out everything so you’re not reaching around with a needle in your hand.
- Check medication (expiration, storage requirements, and correct labeling).
- Confirm route and dose exactly as prescribed.
Injection basics (focus and calm)
- Disinfect the site with an alcohol swab and allow it to dry.
- Use the technique specified for the route (SC vs IM) in your instructions.
- Dispose immediately after use in the correct sharps container.
Aftercare and tracking
- Monitor the site for irritation or unusual swelling.
- Track your schedule (dose date, time, site used) to maintain consistency.
- Review progress with your clinician based on labs and symptoms.
What results to expect and how to stay consistent
When people ask about a b12 injection kit, what they usually want to know is: “Will injections work for me?” The honest answer is that response depends on why your B12 is low, your baseline deficiency level, and whether you’re treating the underlying cause (dietary insufficiency, absorption issues, medication effects, etc.).
In practice, what I’ve seen work best is consistency. If your clinician recommends a schedule, sticking to it supports more predictable improvement. If symptoms worsen, don’t “push through”—contact your clinician promptly.
How to build consistency
- Pick a stable day and time window.
- Rotate sites if your clinician advises it.
- Keep a dosing log so missed doses are easy to track.
FAQ
Is a b12 injection kit the same as the B12 medication?
No. A b12 injection kit typically refers to the supplies and administration tools (syringes, needles, swabs, and instructions). The B12 medication itself is the prescribed drug, which must match your clinician’s dose and route.
Can I choose my own injection route with a kit?
You should follow your prescription. SC and IM injections involve different placement and technique. Using the wrong route can increase discomfort and may affect how your treatment is delivered.
What should I do if I get significant redness, swelling, or pain after an injection?
Mild soreness can happen, but significant or worsening redness, swelling, fever, or severe pain should be assessed by a clinician. Keep the injection log (date, site, dose) to help your clinician evaluate what happened.
Conclusion: Choose the right kit, follow the route, and keep a repeatable routine
A b12 injection kit can make home administration more manageable—especially when it includes the right sterile supplies, clear instructions, and practical disposal guidance. The key is matching the kit to your prescribed route and dose, using a consistent injection-day workflow, and staying in touch with your clinician for labs and symptom tracking.
Next step: Confirm your prescription details (dose, route, frequency) and then buy a kit whose included needle/syringe, instructions, and disposal guidance explicitly align with that route—so your first week is set up for safety and consistency.
Discussion