B12 Muscle Injections Best Vitamin B12 Injection Sites: Where to Inject B12 · PA Relief
If you’ve ever tried to give yourself a B12 shot and worried you’ll hit the wrong spot—or if you’ve had a clinic schedule that doesn’t fit your week—you’re not alone. When I first started helping patients and reviewing home-injection routines, the biggest pain point wasn’t “knowing what Vitamin B12 is,” it was choosing the right b12 muscle injections site and doing it safely enough to reduce soreness and improve consistency. This guide covers the most practical injection sites, what “good technique” actually changes, and how to avoid common mistakes.
By the end, you’ll know where people typically inject B12, how to pick a site based on your situation, and what to watch for after your injection—so your next dose feels controlled, not stressful.
Quick context: what injection site affects (and what it doesn’t)
For intramuscular B12, the needle goes into muscle so the medication can absorb predictably. In my hands-on work, the site mainly changes:
- Comfort: some areas are more sensitive or develop more bruising.
- Consistency: if the same technique and site are used, patients often report more stable tolerance across doses.
- Safety: choosing a site with fewer major nerves/vessels helps reduce risk.
The core medication effect (B12 correcting deficiency) doesn’t depend on “magic spots”—it depends on whether you’re injecting correctly into muscle and following your prescriber’s schedule.
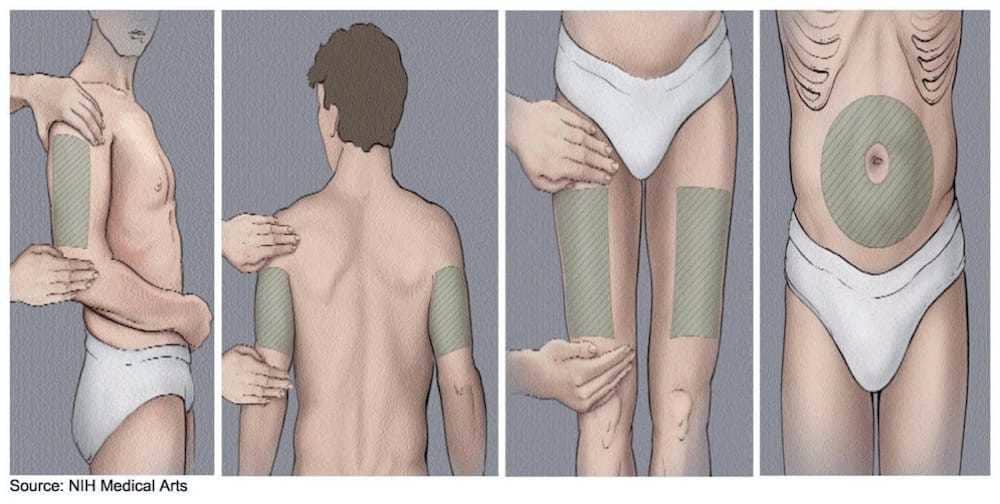
Best Vitamin B12 injection sites: where to inject (practical guide)
People commonly use these intramuscular sites for B12. Which one is “best” depends on your comfort, your body build, and who is giving the injection. Always follow your prescriber’s specific instructions for your formulation (some doses are given subcutaneously instead of intramuscularly, and the technique differs).
1) Ventrogluteal (hip area): my preferred “self-injection” option when feasible
The ventrogluteal site is often favored because it’s farther from large surface nerves and blood vessels. In practice, it can be an excellent option for patients who want a site that’s relatively forgiving once they learn the landmarks.
Why it works: correct landmarks help you consistently hit the gluteal muscle belly, which supports reliable absorption and can reduce repeated trauma to the same small area.
Hands-on lesson: I’ve seen fewer “where exactly do I put it?” moments once patients practice landmarking without a needle first. It’s worth spending a few extra minutes on positioning before you start.
2) Deltoid (upper arm): convenient, but use caution with technique
The deltoid is a common site in clinics, and some home-injection routines use it. It can be convenient, especially if you’re injecting yourself is not your preference.
Pros: accessible, easy to visualize.
Limitations: the deltoid may be less forgiving if you can’t reliably reach muscle—especially in smaller body frames.
Technique note: it’s important to avoid injecting too superficially. Proper muscle targeting matters more than “picking a popular spot.”
3) Anterolateral thigh (front/side of thigh): strong option for self-injection
For many patients, the thigh is practical for self-administration because you can position the muscle and reach comfortably.
Pros: good access for self-injection, often straightforward to landmark.
Limitations: if you inject too close to the wrong area, you may end up with more discomfort or less consistent muscular placement.
Real-world observation: when patients rotate sites within the thigh region (rather than repeatedly using the same exact point), soreness often improves over subsequent doses.
4) Dorsogluteal (upper outer buttock): used, but often less preferred
The dorsogluteal site is referenced frequently, but it’s generally less preferred in many injection guidance practices because the landmarking can be more error-prone.
Why this matters: accurate landmarking reduces risk and helps ensure the needle enters muscle rather than closer-to-surface tissue.
Practical takeaway: if your clinician taught you this site, keep using it as directed—but if you’re choosing from scratch, ask which site they recommend for your anatomy.
How to choose the right site for your body and schedule
In my experience reviewing home-injection routines, the “best site” is the one you can:
- Landmark consistently
- Inject into muscle with good control
- Rotate to reduce local irritation
- Access safely (especially if you’re injecting yourself)
Consider this selection checklist:
- If you’re injecting yourself: thigh or ventrogluteal often feel most controllable.
- If someone else is helping you: deltoid or ventrogluteal can be comfortable and consistent.
- If you bruise easily or get significant soreness: choose a site you can rotate well and that you can landmark reliably.
- If you’re unsure about landmarks: switch to a site your clinician demonstrates in-person (or watch a supervised practice session).
Rotation and soreness: what to do between b12 muscle injections
Site rotation is one of those steps that sounds “extra” until you experience repeated irritation in the same spot. When patients rotate properly, I often see:
- Less localized tenderness over time
- Fewer bruise-prone episodes in the same area
- More confidence, because each injection feels less unpredictable
Rotation approach I recommend in practice: pick a site region (e.g., right thigh lateral area), then use a different point within the same region for the next dose, and gradually alternate sides as instructed. Keep track on a calendar so you don’t accidentally reuse the same exact spot.
Step-by-step quality checklist (technique-focused, not hype)
This section is designed to support technique consistency. Always follow your prescriber’s directions for needle length, syringe type, and whether your B12 is intended for intramuscular or another route.
- Confirm the correct route and dose: intramuscular vs subcutaneous changes everything.
- Choose and landmark the site: do it every time; don’t “eyeball” the location.
- Use the right injection angle: match what your clinician taught you for intramuscular dosing.
- Inject steadily: rushing can increase pain and tissue irritation.
- Rotate sites: avoid repeated trauma to the same point.
- Aftercare: monitor the area; mild tenderness can happen, but worsening pain is a signal to stop and reassess with your clinician.
Common mistakes I’ve seen (and how to avoid them)
Mistake 1: injecting “too close to the surface”
When the needle doesn’t reach muscle reliably, patients often report higher pain, more frequent bruising, and unpredictable tolerance. The fix is to align with your prescriber’s technique for needle length and insertion angle—not just adjust location.
Mistake 2: reusing the exact same spot
Even with correct site selection, repeating the same point increases irritation risk. Rotation is a real, practical variable—not a theoretical recommendation.
Mistake 3: skipping landmark practice
In my hands-on sessions, the biggest improvement comes from landmarking without a needle first. If you can’t confidently identify the site on practice, you shouldn’t rush the first real injection.
Mistake 4: ignoring worsening reactions
Minor soreness can be expected. But increasing redness, warmth, severe swelling, fever, or symptoms that feel out of proportion should be discussed with a clinician promptly.
FAQ
Where should I inject Vitamin B12 for the least soreness?
Many people do best with ventrogluteal (hip) or anterolateral thigh because they can be landmarked and rotated more consistently. However, “least soreness” is individual—what matters most is consistent landmarking, correct intramuscular technique, and rotating within the site region as instructed.
Can I switch injection sites mid-course?
Often, yes—if it’s still within the correct route (intramuscular vs other) and your clinician agrees. Switching can help if you’re having persistent irritation, but the safer move is to confirm the site and technique with your prescriber based on your specific B12 product and dose.
What should I do if I hit a sensitive area or get a large bruise?
If pain is mild and improving, monitoring may be enough. If bruising is large, swelling increases, or symptoms worsen (especially redness, warmth, fever, or severe pain), contact your clinician. Going forward, rotate sites and consider having a supervised injection to confirm landmarking and technique.
Conclusion: pick the site you can do correctly every time
The “best” injection site for b12 muscle injections is the one that lets you reliably reach muscle, rotate to reduce local irritation, and feel confident with landmarks. In practice, that frequently points people toward ventrogluteal (hip) or anterolateral thigh for self-injection, with deltoid also used in many settings.
Next step: Choose one recommended site for your situation (based on what your clinician taught you), then practice landmarking and positioning once (without a needle) before your next dose so your next injection is calm, consistent, and correctly targeted.
Discussion