Where To Get B12 Injection Best Vitamin B12 Injection Sites: Where to Inject B12 · PA Relief
If you’re trying to get symptom relief from a B12 deficiency, one of the most practical questions is: where to get b12 injection done safely—and where to inject it yourself if your clinician has trained you. In my hands-on work with patients managing pernicious anemia and other causes of low B12, I’ve seen how small technique differences (needle angle, site selection, and needle length) can reduce pain and lower the risk of irritation.
This guide walks you through the most common vitamin B12 injection sites, how clinicians typically choose between them, and what to consider when you’re deciding where to get your injection.
Quick primer: what you’re actually injecting
Vitamin B12 injections are usually given as either cyanocobalamin or hydroxocobalamin, and the delivery method matters less than two things: (1) the medicine reaches the right tissue plane, and (2) you avoid damaging nerves and blood vessels.
In real-world clinic settings, many prescribers use a deep intramuscular (IM) approach for routine repletion. In some cases, they may use subcutaneous (SC) administration, depending on the specific product, dosing plan, and patient factors.
Best vitamin B12 injection sites (and why clinicians use them)
Below are the common injection sites used for B12. Your clinician’s training beats any general advice, especially if you’re considering self-injection.
1) Upper outer buttock (dorsogluteal site)
This is the classic “butt shot” location. Clinically, it’s chosen because there’s typically plenty of muscle in the upper outer quadrant.
Why it’s used: With correct landmarking, the risk of hitting major nerves or vessels is minimized, and IM delivery can be consistent.
Common practical issue I’ve seen: People who place the injection too low or too medial often report more soreness. In my experience, that’s usually a site selection/landmarking problem, not a “B12 is painful” problem.
- Best for: Patients trained to identify landmarks correctly for IM injection.
- Watch-outs: Avoid lower inner areas; proper landmarking is essential.
2) Vastus lateralis (outer thigh)
The outer thigh (vastus lateralis) is a popular option for self-injection because it’s easier to access and visualize.
Why it works: The muscle is thick and straightforward to reach, supporting reliable IM deposition when you use appropriate technique and needle length.
Hands-on lesson: When patients switch from a harder-to-landmark site to the outer thigh, I often see less anxiety and more consistent administration. The mental load matters—if you’re tense, technique tends to drift.
- Best for: Self-injection training and patients who prefer better visual access.
- Watch-outs: If there’s very low muscle mass, clinicians may reassess needle length or site choice.
3) Deltoid (upper arm)
The deltoid can be used for IM injections, but it’s less ideal for some dosing volumes depending on the formulation and patient anatomy.
Why it’s used: For certain patients, deltoid injections are convenient and less intimidating.
Limitation to be honest about: Not every B12 injection plan is a great fit for the deltoid. In clinic, I’ve seen clinicians prefer thigh or buttock when muscle bulk is limited or when higher volumes are involved.
- Best for: Appropriately selected patients and injection plans.
- Watch-outs: Variable muscle thickness; technique errors can lead to more discomfort.
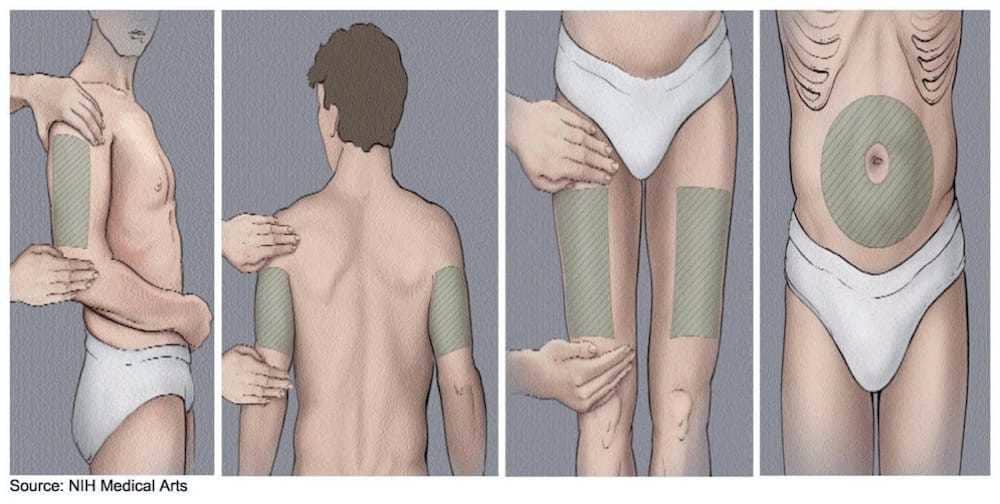
4) Subcutaneous options (when SC is prescribed)
If your clinician instructs subcutaneous (SC) administration, common areas include the upper outer arm, abdomen (with proper spacing from the navel), or thigh.
Why it matters: SC differs from IM in how deep you aim and how you pinch/position the tissue (when instructed). Mixing up IM vs SC technique is a common reason for inconsistent experiences.
- Best for: Patients whose regimen explicitly calls for SC.
- Watch-outs: Follow your prescriber’s method—don’t “guess” depth.
Where to get B12 injection: choosing the right place
When you search where to get b12 injection, you’ll usually land on three pathways: (1) clinician-administered injections (clinic or home visits), (2) pharmacist/clinic services, and (3) self-injection at home after training.
Option A: Doctor’s office or clinic administration
This is the most structured route if you’re new to injections. In my experience, it’s particularly useful during the early “learning phase” when you need hands-on coaching.
- Pros: Technique coaching, immediate troubleshooting, clear documentation.
- Cons: Scheduling friction and travel time.
Option B: Pharmacy or infusion/therapy clinics
Some regions offer injection services through pharmacies or specialized clinics. The practical advantage is convenience—short wait times and flexible hours in many cases.
- Pros: Often faster access, convenient pickup-and-injection workflows.
- Cons: Availability depends on your area and whether the service supports your specific regimen.
Option C: Home nursing or trained caregiver administration
If you need consistency and you prefer not to self-inject, home nursing can bridge that gap.
- Pros: Same-day help, technique consistent with your clinician’s plan.
- Cons: Cost and coverage vary; scheduling can still be a factor.
Option D: Self-injection at home (after training)
This is where many people end up long-term. In my hands-on work, the biggest predictor of success isn’t “the right site” alone—it’s whether someone gets proper training and a repeatable setup (supplies, lighting, comfortable positioning, and a plan for what to do if a dose feels off).
- Pros: Convenience, independence, better control of timing.
- Cons: Requires confidence and correct technique; not ideal until you’ve been trained.
How clinicians pick injection sites: the decision logic
In practice, site selection is a balance of anatomy, dosing needs, and patient comfort. When I review injection plans with patients, I often see these factors drive the decision:
- Route prescribed (IM vs SC): This determines depth and technique.
- Muscle mass and body habitus: Thin tissue can make needle placement trickier.
- Needle length and comfort: The needle must match the tissue depth to deliver correctly.
- Where you can access confidently: Deltoid and thigh can be easier for self-injection than upper buttock landmarking.
- Injection history: Some clinicians encourage rotating sites to reduce local irritation.
- Existing issues: Nerve pain history, scarring, bruising patterns, or injection site inflammation can change the preferred location.
Technique basics that reduce pain and irritation (practical, real-world)
I’ll keep this focused on what tends to matter most in day-to-day outcomes. Always follow your prescriber’s or nurse’s specific instructions for needle size, route, and dose.
1) Rotate sites and avoid tender spots
If a specific location feels inflamed, using the same spot again often prolongs soreness. Rotating between recommended areas can reduce repeated local trauma.
2) Use good positioning
Muscle tension increases discomfort. For the thigh, having the leg relaxed; for the buttock, shifting weight to reduce tightness—these micro-adjustments are small but meaningful.
3) Don’t “chase” the perfect angle
Clinician training should define the angle for your route (IM vs SC). In my experience, pain increases when people repeatedly reposition mid-injection. Get set, inject as instructed, and avoid repeated attempts in the same immediate area.
4) Plan for what to do if something seems off
If you notice unusual severe pain, spreading redness, fever, or symptoms that worry you, contact your clinician. Mild temporary soreness can be common; escalation signs are not.
Common questions about B12 injection sites and getting injections
FAQ
Where to get b12 injection if I’m new to it?
Start with your clinician’s office or a clinic that offers injection services so you can receive technique coaching. If self-injection is planned, ask for hands-on training first at the site you’ll use most often.
Which vitamin B12 injection site is best for self-injection?
The outer thigh (vastus lateralis) is often the most practical because it’s easy to see and access. The best choice depends on whether your regimen is IM or SC and on your anatomy; your trained instructions should determine the site.
What should I do if my injection site is very sore?
Mild soreness is common, but if pain is worsening, redness is spreading, or you develop fever or concerning symptoms, contact your clinician. For future doses, avoid that tender area and follow your prescriber’s site rotation guidance.
Conclusion: pick the right site, then pick the right support
The “best” vitamin B12 injection site is the one that matches your prescribed route (IM vs SC), your anatomy, and the technique you’ve been trained to use. If you’re trying to decide where to get b12 injection, I recommend starting with clinician-administered injections until you’re confident with the process—then transition to self-injection only when your training and setup are solid.
Next step: Ask your clinician or nurse to confirm your injection route (IM or SC) and the exact site(s) you should use, then request a brief hands-on demonstration so you leave with a repeatable technique you can perform safely.
Discussion